The process of acquiring real-world signals, or Data Acquisition, is a mystery for most PMs, especially if you haven’t been exposed to hardware. But the more you know about how an end-to-end IoT product works, the more informed conversations you’ll be able to have with your engineering team.
Remember that the goal is not to become a technology expert or to dictate the technology your engineering team should use to build the product. The goal is to understand the technology context so you can join the engineering conversations and add the business and user perspective.
In a previous post, I wrote about the 4 key hardware components included in every IoT Device. In this post, I’m diving deeper into one of these components: the Data Acquisition Module.
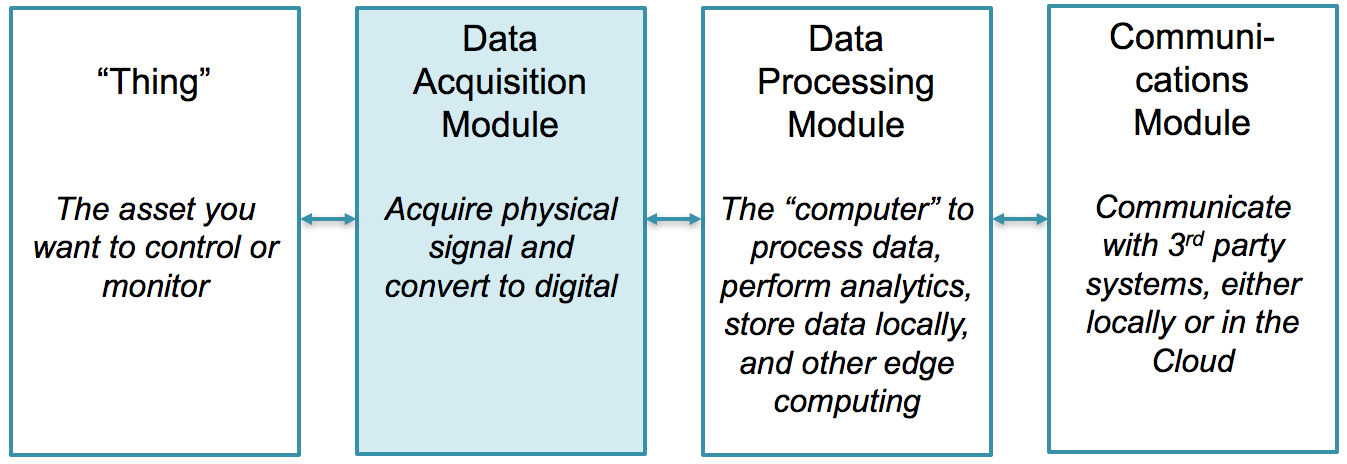
The role of the Data Acquisition Module is to acquire physical signals from the real world and convert them into digital information that can be manipulated by a computer.
There are two main types of real-world signals: discrete signals and analog signals. To get you started, in this post I’ll focus only on analog signals.
What is an analog signal?
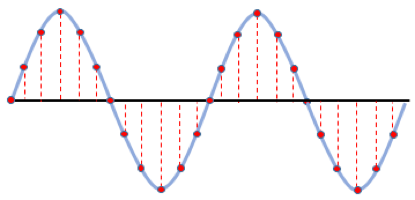
An analog signal is defined as a continuous signal that varies its amplitude or frequency over time. These variations occur in response to a change of the physical phenomena they are measuring. For example, the image below shows temperature fluctuating over time.

Now that you are familiar with analog signals, let’s talk about the hardware and the process necessary to acquire or “digitize” these signals.
The engineering aspect of data acquisition can get very complicated. From a PM perspective, I will focus on these components of the data acquisition process:
- What real-world signal do you want to measure?
- Understanding sensors
- Signal conditioning
- Analog-to-Digital conversion work
- Interpretation of data
1. What real-world signal do you want to measure?
Before you start planning your hardware roadmap, you need to understand what type of physical signals you want to measure. Examples of physical signals include:
- Temperature
- Sound
- Humidity
- Vibration
- Light
- Pressure
- Etc
Notice I’m not jumping straight into selecting a sensor. Sensors are a technology component that provides a means to an end. First, it’s important to understand what type of signal you need to measure and get a good grasp on how you plan to use that information.
Once you determine the type of signal you need, then you’ll need to research some additional parameters before working with your team to select the right sensors. Here are some key questions you need to answer:
What is the exact signal type you’ll measure?
It’s not enough to say you want to measure “gas”. Which type of gas? Oxygen? CO2? What information about the gas do you want to measure? Flow? Temperature? Particles per square inch? Be specific so your engineering team can choose the best sensor for the job.
How fast does the signal change?
Let’s say you need to measure temperature. Depending on your application, the same physical phenomena (in this case temperature) can change very slowly (i.e. ambient temperature in a room), or can change very fast (i.e. temperature inside an engine).
Understanding how fast your signal changes (rate of change) will help your team select sensors and converters that can keep up with the signal you want to measure.
What is the range of the signal you need to measure?
For example, if you are measuring room temperature, then having sensors with a range of 0-40 degrees Celsius should be enough. On the other hand, if you are measuring temperature inside a furnace, then you might needs sensors with a range in the thousands of degrees Celsius. Once again, the more specific you can be, the more you are empowering your engineering team to make the right decisions.
2. Understanding sensors
There are hundreds of sensors out there, which gives you great flexibility to choose the right sensor for the real-world signals you want measure. But how do sensors work?
All analog sensors produce an electrical signal (voltage or current) that represents the variations of the real-world signal you want to measure. As the real-world signal varies over time, the sensor will produce an electrical signal that accurately represents those variations.
3. What is signal conditioning?
Each type of sensor produces a different level of voltage or current output. And oftentimes, the output of the sensor is not compatible with the input range required by the analog-to-digital converter (ADC). Or maybe your device hardware is installed in a place with a lot of electromagnetic noise, and you need a way to clean that signal up before passing it to the ADC.
Signal conditioning refers to the process of manipulating the output of your sensor so it can be consumed by your ADC. The most common forms of signal conditioning are:
- DC offset
- Amplification
- Attenuation
- Filtering
Many vendors have signal conditioning products you can add to your device hardware to ensure the signal coming from your sensors is ready for processing. These products range from individual chips to full hardware modules for specialized applications. Work with your engineering team to determine the best approach for your application.
4. Analog-to-digital conversion (ADC)
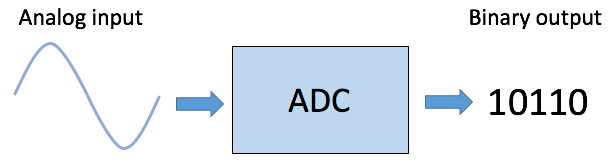
Your device hardware needs to digitize the signal coming from your sensors before that data can be used by a computer. This process is call analog-to-digital conversion.
Analog-to-digital conversion is a very in-depth topic, so in this post I’ll only focus on the most important parameters Product Managers need to know.
An analog-to-digital converter (ADC) is a piece of hardware (usually a chip) that digitizes a signal by constantly taking individual samples of that signal.
The key parameters to consider in an analog-to-digital converter are sample rate and resolution.
Sample rate
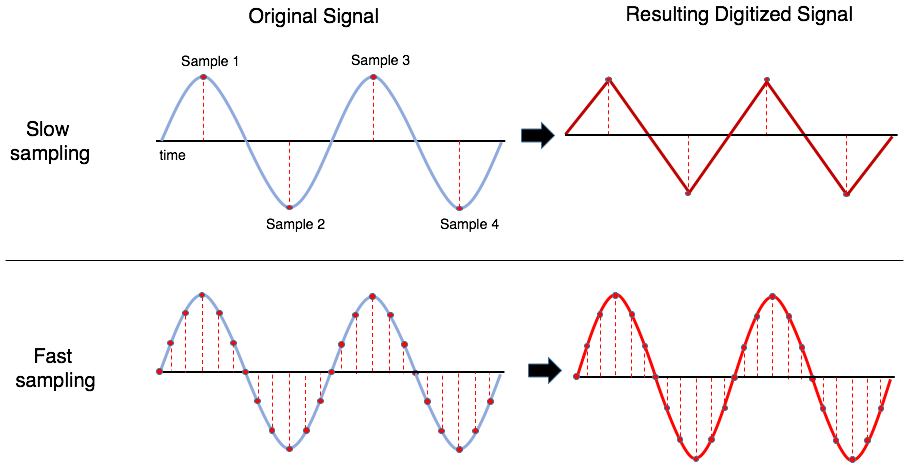
Sample rate refers to how often is the ADC taking samples of the analog signal. To accurately reproduce the frequency content of an analog signal, the ADC needs to sample at least twice as fast as the signal’s highest frequency. This is based on the Nyquist frequency.
If you want to reproduce not only the frequency content, but also the signal’s shape and amplitude in the time domain, then the ADC needs to sample at a much higher rate. The engineering rule of thumb is to sample 10x the frequency of this original signal. That means that if your signal has a frequency of 100 Hz (100 cycles per second), then your converter needs to sample at 1,000 Hz.
The images below show the result of slow vs fast sampling of an analog signal.
Resolution
Resolution refers to how granular you want your accuracy to be. Resolution is specified by the number of bits the ADC uses to represent each sample. So for example, you can have a 2 bit ADC, 4 bit, 8 bit, 24 bit, etc. A 2 bit ADC could register 4 values (2^2 = 4). A 4 bit ADC can measure 16 values (2^4 = 16) and so on. The more bits per sample, the better your measurement’s resolution will be.
Let’s look at an example. Let’s say you have a thermocouple (temperature sensor) that can measure temperature changes between 0 and 96 degrees Celsius. If you use a 4 bit ADC, then you have 16 possible values (2^4 = 16) to represent the complete range of the sensor. An ADC output of 0 corresponds to 0 degrees and an ADC output of 15 corresponds to 96 degrees.
If you divide the measurement range by the number of ADC values, you get the minimum step size you can measure. In this case, the step size is 6 (96/16 = 6). What this means is that the smallest temperature variation you can register with this ADC is 6 degrees.
Now think of the same example using an 8 bit ADC. If we divide the full range of the sensor (96 degrees C) by the ADC resolution of 256 (2^8 = 256), the result is 0.375 (96 / 256 = 0.375) which means that with an 8 bit ADC, you’d be able to distinguish temperature changes as small as 0.375 of a degree!
A key takeaway from a PM perspective is that the combination of sample rate and resolution determines how much data your device produces. For example, if you have a 24 bit ADC and you are sampling at 200 kHz (yes, 200,000 samples per second), then you’ll be producing 600kB of data per second in just this one sensor. This is data that you’ll need to process at the edge, maybe transmit to the Cloud, store, backup, etc.
Now that you know how to perform these calculations, you can estimate how much raw data your product will produce per day / month / year. Be aware that machines can produce a ton of data almost instantaneously. Be mindful of these calculations so you understand how they impact other areas of the IoT Technology Stack and other Decision Areas such as Business and Security.
5. Interpretation
Now that you have the digitized signal, you need to apply some transformation to make sense of that data. Remember that the output of a sensor is just a number that correlates to the changes of the physical phenomena they are measuring.
Going back to the temperature example, a thermocouple doesn’t return values in degrees Celsius or Fahrenheit. It just returns a number that you need to convert to a unit that makes sense for humans to use. This process is called interpretation.
Keep in mind that each sensor is different. The manufacturer of the sensor will provide you with a formula to convert the raw value into a usable unit.
During the interpretation process, it is also common to attach metadata to your sensor measurement. Some metadata might include:
- Timestamp (added to each ADC sample to create a time series)
- Sensor ID
- Location ID
- Device ID
- Etc
The Bottom Line
Data acquisition is a key component of every IoT product. It is a deep and complex discipline, and you don’t need to be the expert. Your goal as a PM is to understand how the technology works and how the pieces fit together so you can have productive conversations with engineering.
Your focus shouldn’t be on the data acquisition process itself, but on the elements of your data strategy, including how much data you’ll produce, how much you transfer, and more importantly, how you will provide value to your customer with this data.
1 Comment

very good intro.